Friday, September 11, 2015

Vintage Pin Holder

Hello, everyone! It's Karen with you today, sharing my take on Sandy's fun theme of Putting on the Ritz. :o)  Since I did the fashionable route with my previous card, I decided to ritz up a Christmas gift this week.

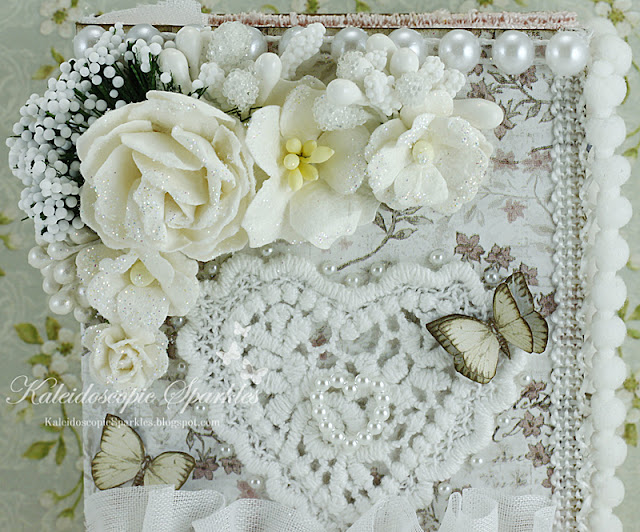
Vintage pins (sometimes referred to as stick pins) are one of the loveliest embellishments for crafting and they make a beautiful gift. I thought it would be fun to present them in their own ritzy packaging that also serves as the pin holder.
Flowers blossom and trims abound on the exterior, where an abundance of pretty felt ideal. This will be handled and used often by the recipient, so I wanted it overflowing in texture. I chose Maja Design's Vintage Summer Basics 1910 for my background, while the butterflies are from Coffee in the Arbour.
Wild Orchid Crafts flowers are sprinkled with Glamour Dust, bordering a double dose of love. A Pearl Heart rests atop my favorite Lace Heart Appliqué, which is surrounded by tiny pearls.
Vintage Crown Pearl pins are nestled inside, engulfed in more of Sandy's gorgeous trims. (There will be three on each side before gifting... I need to do some LLC shopping!) Rhinestone Trim softly lines the top, while the pins are covered with Shabby Rose Organza and Marguerite lace.
I managed to stay away from my favorite trim for a few weeks, but couldn't hold out any longer. ;) Shabby Chiffon Ruffle Trim flutters down the center, lined with a Flatback Pearl String. Sunflower Pearl Trim accents it on the front of my holder. This was a fun project and I look forward to making more with different papers, themes, and pins. :o)

Thank you for visiting LLC and I wish you a beautiful weekend. :o)

Hugs and blessings,
Karen

Thursday, September 10, 2015

Sing Hello

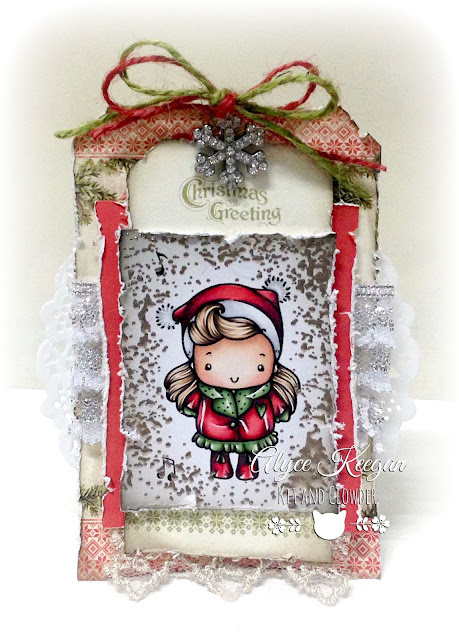
Hi everyone! It's Alyce here and for my project today I've decided to "Ritz" up my Christmas cards with some silver bling! I've used the brand new Christmas In Norway Pion Designs papers to complement this new image by The Greeting Farm called Sing Hello.

I've used some Silver Frantage around the image, some silver lace, and a silver bling snowflake charm! The tags are all cut from one of the new sheets of Pion Designs papers (See the link below)


She's coloured up with Copics and you can find a full colour list over on my blog. Thanks so much for stopping by!


Wednesday, September 9, 2015

Ritzing up the kitchen

Hi Everyone,
It's Sandy here. I'm astouned I'm actually still here...LOL My husband and I recently bought a new house and every single free minute away from our ordinary jobs we've been working on the refurbishments. Hence; no crafty playing time for me :-( Friends & family can already now prepare for a Clinton/Hallmark Christmas card coming their way this year... ;-)

BUT nonetheless I have a project with LLC products used that I can share with you today. :-)

The previous houseowner built the kitchen cabinets himself, and I love the prominent wooden piece above the cooker. However; the kitchen had seen it's better days. It was looking a bit tired and dated:

So I decided to spruce it up and bring in some more light by painting the cabinets white.
For this I used the world famous Annie Sloan chalk paint.

Chalk paint is a water based paint, and the great thing about it is that you can get straight down to painting. No stripping, sanding, or priming is required! It adheres to almost any surface and it's very easy to use and you can achieve lots of  different looks i.e. smooth, distressed, textured, shabby surfaces. And since it is waterbased, if you're like me a messy painter and tend to spill here and there, no worries; since the paint is waterbased you can easily wipe it off with a wet rag. :-)
Once you're done painting your piece, it just needs to be vaxed and you're done!
The wax finish is what seals and protects your piece.


So this is what it looked like after painting and vaxing. Already a huge improvement, but it was a bit dull, so I started thinking about what I could do to make it more interesting and put even greater focus on this lovely gingerbread work. 

That's when I reached for the Americana Decor stencils:

I decided to use two different ones; The French Bakery and Café Paris.
I attached the stencils with masking tape:

 Here's a close up of the Paris stencil after I had gone over it with my stencil brush. (If there are any Annie Sloan fans out there reading this, the colour used on the cabinets is Old white and for the stencilling French linen):

The two pictures on top show how it came out after the stencils had been removed. I decided to shabby it up a bit more though by going over it with a sandblock to achieve the distressed look. It's important to remember to use a very fine grit (I used 240P) and not to rub it in both directions, only in one.

Voilà!!!

Now I just had to do something about those hideous tiles...

They also got the white treatment, but with a SPECIAL TILE PAINT. Please note: I would NOT recommend using chalk paint for tiles. Simply because they are prone to get dirty and come into a lot of wear when wiping them off regularly and I'm unsure how well the vax would protect them.

Thanks for stopping by today.
I hope I have inspired you to use chalk paint and/or stencils in a home decor project of your own.

Hugz, Sandy


Tuesday, September 8, 2015

Puttin' On the Ritz

Good Morning,
Sandy here with Tina's take on this week's theme "Puttin' on the Ritz".

The word "Ritz" derives from César Ritz, a Swiss hotel entrepreneur, who let build the luxerious Ritz hotels in London, Paris, and New York.  The slang expression "putting on the Ritz," means dressing up stylishly or fashionably. It can also be interpreted as glamourising or pimping something up, and that's exactly what Tina has done today...

She's taken an old wooden frame and transformed it into this;
Now this is some serious pimping with LLC products. :-)


  Thanks for stopping by.
Hugs from Tina & Sandy